Lovely Tennessee

Lovely Tennessee

Thursday, June 6, 2013

Time's Heart of Mine

Heart of Mine is my new purebred doeling I got for a Mother's Day gift.
 
Me & Heart the day I picked her up to bring her home.
 
Months ago when I went to pick up my new little buckling, Dream from Davis Run Nubians.  Jenny and her daughter Davis showed me around and I got to meet her herd.
 
I spotted a new mom with triplets.  They were so cute and small. They had just been born a few days prior.  I of course was drawn to them because all the babies were black.  For some reason I am currently drawn to black goats.  I just love how sleek their coats look.
 
Anyway, I of course asked if they were for sale, especially the little doeling that had gorgeous white markings on her.  Jenny said they hadn't decided yet but they were pretty sure they were keeping her.  So on we went with the tour and while we were in another baby pen, Jenny brought me the little doeling asking her daughter Davis is she wanted to keep her and Davis said it was okay to sell her!!!  Jenny put the doeling in my arms and I was done for.
 
Now came the hard part convincing my hubby to let me have her.  To make a long story short, he said yes and that she could be my Mother's Day gift!!!  Now most people wouldn't want a goat for a mother's day gift but it was PERFECT for me!!!
 
We decided to have the dam raise her since I already had 2 bottle babies at home. So she stayed at Davis Run Nubians for the next 8 weeks until she was old enough to be weaned from her mom.
 
Heart on the ride home
 
Heart is a big girl. She weighed 36lbs at 8 weeks old and barely fit in the basket I brought for her.  We made it work and got her home.
 
If your wondering about the title of this post, it is her name.  Her full name pending ADGA approval will be Davis Run Time's Heart of Mine.  As you all know, I love all things Scottish so of course I had to incorporate that if I could.  In Scottish Gaelic the word Heart is cridhe.  It is pronounced Cree.
Heart's call name is Cree.
 
Cree comes from excellent blood & milking lines and I am so excited to be adding them to my herd through Cree.
 
 
   Sire: *B Kastdemur's Time Is On My Side
          SS: *B Kastdemur's Time In A Bottle
                   SSS: SG++*B Kastdemur's LH Full Service
                            SSSS: GCH++*B Kastdemur's MPR Liason
                            SSSD: GCH Kastdemur's HCK Hailey 3*M
                   SSD: SGCH Kastdemur's Temerity 5*M
                            SSDS: Sweet Harvest Show Time
                            SSDD: GCH Kastdemur's Audacity 4*M
          SD: Kastdemur's Tainted Love 2*M
                   SDS: GCH++*B Kastdemur's Audacious
                           SDSS: SG++*B Kstdemur's LH Full Service
                           SDSD: GCH Kastdemur's Aubree 3*M
                   SDD: GCH Lassenwood Miller Valentine 1*M
                           SDDS: +B Prairie-Patch Miller
                           SDDD: Manges-Colony Valentina
 
Dam: Davis Run HC Constance Willow
         DS: Hoanbu ATL Calient
                   DSS: CH*B Wingwood Farm Finding Atlantis
                           DSSS:+*B Wingwood Farm Real Tactitian
                           DSSD: SGCH Wingwood Farm Tim Aminance 1*M
                   DSD:Hoanbu TM California Dreamin
                           DSDS: SGCH+*B Wingwood Farm TS Timothy
                           DSDD: SGCH Hoanbu Strpes Caravelle Misty 1*M
         DD: Willow Run Eros Consuelo
                   DDS:*B Willow Run Theses Eros
                           DDSS:++*B C/F Thesus
                           DDSD: SGCH Willow Run at Erazel 2*M          
                   DDD: Willow Run Valmont Constance
                           DDDS: SG*B Willow Run Enferno Valmont
                           DDDD: Willow Run SGTPR Constellation    

 
Cree has now been with the herd for a few weeks now and she is doing wonderful.  She stays close to Whimsey, I think she thinks she is her mama, since they are both black.  Thankfully Whimsey is a sweet doe and doesn't mind it.  Cree has also become best friends with our other new doeling Juliet.  They go everywhere together and if one wanders away to far the other will start yelling for them.  I'm so happy they have each other to grow up with.
 
Of course I can't forget to show a bunch of pics, so here they are.
 
Cree meeting all the girls

Cree - isn't she gorgeous?

Cree, markings on right side

Cree, markings on left side


I can't wait to watch her develop and see what she will produce in kids and milk.


Thursday, May 23, 2013

My Baby is 13!!!!

Drew turned 13 on May 11.  I can't believe I'm a mom of a teenager.  Time as gone by so quickly.
 
Drew with Lou when he was 8
 
Look it that cute picture of him just 5 years ago.  I really don't know where the time has gone.  I do know that it has been filled with him having the time of his life.  Having fun with his family and friends.  Getting to do the things he loves, like playing sports and going on new adventures and learning new things. Going to school and excelling in all of his subjects.
 
He had a great birthday with a bunch of his friends.  He had 6 boys sleep over on Saturday.  I went and picked everyone up Saturday afternoon and once we were back at the house they all went and played outside.  They played basketball and capture the flag and whatever else they could find to do.
 
We had pizza and cheesy bread for dinner and of course birthday cake for dessert.  Then once it got dark they all came in the house and just played Xbox and hung out for awhile and then they watched a movie.  They also got to make their own sundaes for a snack.
 
They all found a place to sleep and then the next morning we made a big breakfast for all of them of pancakes, bacon and fruit.  Wow can boys eat!!!
 
He had a great day and night with all of his friends. 
 
Here are some pics of the party.  They aren't too good since all the boys didn't want their pictures taken and Hailey decided to be funny and make faces in all the pictures.
 
Drew with his cake Hailey & I made
 
Troy, Colby, Devon and Coby in the back

Orry, Coby, Troy and Drew 

All the kids waiting for cake

Troy, Colby, Hailey, Devon, Drew & Orry 

Troy, Coby, Hailey & Drew 

Drew with his cake


Monday, May 13, 2013

Feta Cheese

I have been making Feta cheese now for over a year.  The flavor is wonderful but I've always wanted to get that crumble texture you get from store bought Feta.  I have finally achieved it.
 
I first start by taking 2 gallons of fresh goats milk and flash pasteurizing it.  Flash Pasteurization is heating your milk to 165 degrees and holding that temp for 15 seconds.  Then I take the whole pot and place it in my sink and fill the sink with cold water and ice cubes.
 
This will cool your milk faster.  Cool your milk to 86 degrees.
 
Milk heating up for pasteurization
 
Once your milk is at 86 degrees, add in your cultures.  I order all of my cultures from www.cheesemaking.com.
 
I add in 1 package of Direct Set Mesophilic and 1/4 tsp Lipase Powder. Let cultures rehydrate for 2 minutes and then stir in gently. Cover milk and let ripen for 1 hour.  Next add in your Rennet.  I use 1/2 tsp liquid rennet added into 1/4 c water.  Stir gently with an up and down motion.  Cover and let it sit for 1 hour.
 
Adding the rennet to the cooled milk
 
Once it has sat for the hour cut the curds into 1/2 inch cubes and then allow to set, undisturbed for 10 minutes.
 
The curds cut
 
Now comes the most work.  Hope you got some muscles.  You need to gently stir the curds consistently for 20 minutes.  I stand at the stove and put my timer on for 20 minutes and just stir away.  Believe me your arm is gonna get tired.  This is when it would be good to have a helper if you have one.
 
Curds after being stirred
 
Now that your done stirring this is where a lot of people would just hang the cheese.  This year I bought a basket mold, also from www.cheesemaking.com.
 
Pour the curds into the molds slowly and as the mold fills up you need to use the back of your hand to push the curds down and to release all the whey that is in there.  I also use a wire mesh colander to help get some of the whey out first and then pour it into the mold and push out even more whey with my hand.  As you can see from the picture below I just put a cooling rack across my sink and put the molds on it while filling.  Any excess whey just goes down the drain. You could also put a bowl underneath if you wanted to collect the whey. 
 
Feta curds in the molds
 
Once you have all your curds in the molds find something that will fit in the top of it, here I used some Tupperware covers.  This is what is called your pusher.  Place this on top of your curds in the molds and then put a quart mason jar filled with water on top of it to help weigh it down and push out even more whey.
 
For the first 2 hours you want to turn the molded curds in the mold every 15 minutes.  After the 2 hours you can turn the molded curds every now and then.  You must leave the curds in the molds with the weights on it for 10-12 hours.
 
That is why i usually start this cheese in the afternoon.  It works out great for timing to let sit overnight.
 
Feta curds being weighted down in the molds
 
The next morning take your Feta Cheese out of the molds.  Below is a picture of what it should look like.
 
Feta just out of the molds

Cut the Feta into large pieces and place in a dish with a brine mixture for 8 hours for 1lb pieces or 4 hours for 1/2lb pieces.
 
Brine mixture can be made by adding 2 cups of non-idolized salt to 1/2 gallon of water then topping up to 1 gallon with water.  Some of the salt will not dissolve, that is okay. This brine can be filtered and reused again for your next batch of Feta.

 
Feta cut up and in brine
 
Once your time is up you need to place your cut cheese pieces onto cheese mats or I just used my cooling rack again.  Cover with a piece of cheese cloth or clean fabric and place in your fridge for 2-3 days, turning your cheese pieces a few times a day.
 
After the aging period is done I just crumble up the Feta with my fingers and keep in an air tight container for up to 2 weeks.  Most of the time it doesn't last that long though.
 
Note:  I do not add any extra salt to my recipe because I add Lipase Powder instead.  Also the brine is heavily salted too.
 
If you aren't going to use your Feta right away you can store it in the fridge in an air tight container in a 6-8% brine.
 
6-8% Brine: 3/4 to 1 cup of non-idolized salt in 3 quarts of water. Make sure all the cheese is covered in the brine leaving no space.  This will help to ensure that no mold with grow on the cheese.

Feta AND it crumbles!!!
 
If for any reason your Feta is too salty for your taste you can let it soak in milk for a few days.


Wednesday, April 24, 2013

Goat's Milk Soap Making

I have been wanting to try making goat's milk soap for quite a long time but I have been a little weary about it because you hear so many things about lye being so dangerous.
 
So when Kim and her daughter Anessa, our herd share clients and new friends, decided to make soap too, we thought it would be fun to make it together.
 
Kim and Anessa received all of their soap making supplies first so they were nice enough to bring everything to our house and we made soap for the first time.
 
It was EASY!!!
 
This is the basic recipe we used.
 
16 oz. Olive Oil
6 oz. Coconut Oil
4 oz. Palm Oil
3.5 Oz Lye
4 oz. distilled water
4 oz. goat milk
1-3 drops of Grapefruit Seed Extract for preservative (optional)
1-2 oz. of Essential/Fragrance Oil (optional)
 
We first measured out all of the oils into a large pot.
 
Anessa & Hailey measuring the oils
 
Next you heat up the oils just till they are all melted, take off of stove, set aside and let cool to 85 degrees.
 
Next we measured out the amount of Lye.  Make sure to wear protective eye goggles and rubber gloves.  Lye WILL burn you if it comes into contact.
 
Hailey & Kim measuring the Lye
 
Once we had the Lye measured, we measured out the distilled water and goat's milk.  The goat's milk is frozen which helps keep the heat produced from the lye down.
 
Place a large bowl in the sink and fill with cold tap water and some ice cubes, then place a smaller bowl in the larger bowl and add the distilled water.  Slowly mix in the lye making sure it is fully dissolved.  Add in your frozen goat's milk and stir to combine completely.  Check the temperature, it should be 75-80 degrees. If it's higher than that just leave it be for a couple of minutes to cool.
 
Kim stirring in the lye into the distilled water.
 
Once you have your lye/water/goat's milk mixture at the right temperature check your oils temperature. If you choose this is when you would add Essential/Fragrance Oil and also your preservative to your pot of melted/cooled oils.  We decided to add the Grapefruit Seed Extract for preservative and also a fragrance oil called Energy that smells really good.
 
Lastly, poor your Lye/water/goat's milk mixture into the oil mixture slowly so it does not splash and start stirring.  At this point you can continue to stir until the mixture thickens or you can use the short cut of using a stick blender.  If using a stick blender like we did, just pulse it a few times and then stir, continue until it is the right consistency.  This will be when trace appears.  Trace is when you have a spoon in the mixture and you pick up the spoon and drizzle some over the top.  If the drizzle sits on top of the mixture before it sinks in then you have achieved trace.
 
Anessa stirring the soap for a bit
 
Once you have achieved trace your soap is ready for it's mold.
 
soap ready for the molds
 
Kim bought 2 types of molds.  One was a wooden box mold and the other was plastic tray molds, the same kind as you use for making candy.  We made two batches of soap and used both molds.  I have to say though I really liked the wooden box one. It was much easier to get the soap out of.
 
We did wrap the wooden box mold with Syran wrap since it would make for easier clean up.
 
Kim & I pouring the soap into the wooden box mold
 
Soap in the wooden box mold
 
Now we wait, set aside the soap in the molds for 12-48 hours.
 
Now it's time to cut the soap.
 
Hailey cutting the soap
 
The waiting time isn't over yet.  We have to let the bars of soap cure.  We stood them up on their sides so more of the soap surface is available to help cure them. Cure time is 4-5 WEEKS, Yes we have to wait weeks to find out how our lovely soap turned out.

Goat's milk soap bars
 
We can't wait to try our new goat's milk soap.
 
A big thanks to Kim and Anessa for sharing all of their soap making supplies, we can't wait to do it again when our supplies get here.


Saturday, April 20, 2013

All the Babies have Gone

All of the baby goats that were born here on our farm, Russell's Ridge Nubians have left to go to their new homes.
 
They have all gone to really good homes and I couldn't be happier with all of the families that chose us for their Nubian.
 
The first to go was Daisy.  I love all the babies but there is always one that sneaks into your heart and Daisy was the one this year.  She has gone to live in Alabama with a wonderful family, who has little girls that have become Daisy's best friends.
 
Her new home decided to keep her name Daisy.
 
  Daisy - Isn't she gorgeous!!
 
Next to leave was Duncan and Sam. They are living together here in Tennessee.  Duncan has gone to be a herd sire to a current herd of 3 does.  Sam got to go along as a wether and be his friend and keep him company when he is not visiting the girls.
 
They were both sweet boys and loved to be petted and hugged and held.  I sure do miss them.
 
I had Hailey take a bunch of pictures of me with all the babies the day before they left to go to their new homes.  I love looking at them.
 
Their new owners have decided to change their names, Duncan is now Roscoe and Sam is now Riley.
 
Duncan & I, he has such a curious face

Sam & I, Sam was yelling here even though he was just sitting with me
 
Itty Bitty was next.  Itty Bitty stole my heart from the moment she was born. She was the smallest only weighing in at 4.2lbs.  She was a fighter from the beginning and didn't let her sister or brother push her around too much.  Itty Bitty loved to have lap time and give kisses.
Itty Bitty is living in Kentucky with Jennifer at her farm, Our Little Farm.  Jennifer and I became friends via online since we have a lot of the same interests.  She has a small herd and wanted to add one of our Nubian's to it.  It was very exciting to meet her and her husband Brian in person when they came to get Itty Bitty.  Jennifer is as sweet in person as she is online and I have no doubts she will love Itty Bitty just like I would.
 
Jennifer decided to keep Itty Bitty's name the same.
 
Itty Bitty with her new mama, Jennifer, can you tell she's happy
 
A few days later Maddie's girls Lana & Luna were picked up to go to their new home together.  I was really happy they found a home together since they were really bonded.  Both girls are super sweet.  Lana was on the quiet reserved side and Luna was the outgoing curios one.
They compliment each other very well.
Lana & Luna are living here in Tennessee with Kim and her family at their farm, Smith Rock Hill Farm.  Kim raises meat goats and has always wanted some Nubian's.  Lana & Luna will be the foundation of their future Nubian herd.
 
Kim also decided to keep the girls names the same, Lana & Luna
 
Lana (front) & Luna (back) relaxing on a hot day in the shade in the barn
 
The last to leave was Allen.  Allen's new owner took off 10 days from work to be able to be home with Allen to help him adjust.  Is that nice or what!!
Sissy already has 1 goat.  He is also a wether like Allen and a Nubian too.  His name is Newton.  She rescued him and is not too sure of his age but she wanted to get him a friend just like him.
So Allen is going to be a beloved pet goat living in Mississippi.
 
Allen has been newly named Buckley.
 
Allen meeting his new mama for the first time and already giving her kisses.
 
I always feel both sad and happy when the baby goats are gone.  Sad that they are now longer here with me but happy that they are at their new loving homes.
 
I always try my hardest to pick the best homes for my baby goats.  Some people say they are just goats but if you know me they aren't JUST goats, they are my babies and who doesn't want the best for their babies.
 
Our 2013 kidding season was a success.  We had 4 does and 3 buckling's.  All were born alive and healthy and I can't ask for anything more than that.
 
I have already started planning our 2014 breeding's which I am really excited about since adding in some new blood to our herd. 
 
If your interested in knowing more about our herd you can always visit us at www.russellsridgenubians.com.
 
We have already started a waiting list for 2014. If you would like to be added just let me know.


Wednesday, April 3, 2013

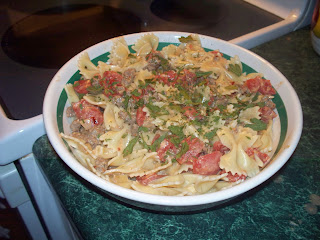
Bow Ties with Sausage & Tomato Cream Sauce

Bow Ties with Sausage & Tomato Cream Sauce.
 
First thing I did for this recipe is to put a large pot of salted water on the stove to boil for the pasta. 
 
In the meantime I chopped up some onion and measured out my already minced from the store, love that, garlic.
 
Chopped onion & garlic.
 
Next I opened up my sausage.  I used our own homemade Italian venison sausage.  You can use any type of sausage.  Next time I think we will try our homemade Chorizo venison sausage to give it a little extra spice.
 
package of our homemade Italian venison sausage.
 
Once the package was opened, I cut open the sausage links and pulled out the sausage out of its casings. 

Italian venison loose sausage.
 
Next add your oil into a large frying pan.  Heat the oil on medium heat and add your sausage and red pepper flakes.  Cook till brown throughout.  Then add your onion and garlic and cook until the onions are tender.
 
Sausage cooked with red pepper flakes, onions & garlic.
 
By now your pasta water should be boiling. Add your pasta to the boiling water and give it a stir.
 
Now back to your sausage. At this point you want to add in your diced tomatoes, cream & salt.  Reduce the heat and simmer until the sauce is the thickness you would like.  Once done pour into a serving bowl and top with parsley.
 
This recipe was really yummy.  I don't like sausage very much but with raising our own pork we have quite a bit of it.  We also make our own venison sausage if it is a good year of hunting.  This recipe was a nice way to cook sausage and have a little bit of a different taste from the tomatoes and cream.
 
The recipe as is below with the red pepper flakes does not make the dish very spicy, just a little bit of heat.  If you want it spicy I would just use hot sausage.
 
Hailey really liked this recipe, which I knew should would because she loves pasta like I do.  Drew thought it was pretty good too put of course being picky he picked out the chunks of tomatoes.  I must be the only person who has a child that loves tomato sauce but not chunks of tomatoes.  Jamie liked it too but he didn't like out the tomatoes were in chunks either.  Maybe next time I will use a smaller can of diced tomatoes and the other replace the other 1/2 with tomato sauce.
 
Either way this was an easy recipe to make, easy to clean up since it only had 2 pot/pan and yummy too. 
 
I'm sure I will be making this again since we will be sending off our two pigs to the butcher soon and will be having lots of sausage.
 
Here is the full list of ingredients and the recipe if you would like to try making it.
 
Ingredients
 
1 (12 ounce) package bow tie pasta

Directions
  1. Bring a large pot of lightly salted water to a boil. Cook pasta in boiling water for 8 to 10 minutes, or until al dente; drain.
  2. Heat oil in a large, deep skillet over medium heat. Cook sausage and pepper flakes until sausage is evenly brown. Stir in onion and garlic, and cook until onion is tender. Stir in tomatoes, cream, and salt. Simmer until mixture thickens, 8 to 10 minutes.
  3. Stir cooked pasta into sauce, and heat through. Sprinkle with parsley

Happy Birthday Jamie

Monday the 1st was Jamie's Birthday. He turned 43.
 
Drew, Jamie & Hailey
 
Usually we go out to dinner but Jamie just wanted to stay home.  The kids and I gave Jamie money for his present as he wants to buy a crossbow for hunting and I don't know anything about that to actually go get one.
 
We had a nice dinner and quiet evening at home.  I also made Jamie a cake. Yellow cake with chocolate frosting.  Yummy!!!

Jamie's birthday cake
 
We just put one candle on for him to blow out since 43 would of been too many.
 
I love you Jamie more now than the day we married.  You are my best friend and I love spending time with you.  Your the best dad and we are so thankful for all you do for our family.


Tuesday, April 2, 2013

Mini Lime Cheese Cakes

Mini Lime Cheesecakes with Goat's Cheese
 
Now that I am getting lots of goat milk, I have been looking for new recipes to try that call for goat's milk or cheese.
 
I came across this recipe and thought that it looked yummy.  We had been invited to our friends out Easter night and wanted to bring a few snacks and a dessert.
 
This wasn't too difficult to make but it takes time.  If you are making your own Chevre this recipe will take 3 days, if your using store bought Chevre then only 2 days.
 
To make the crusts pulse 2 tablespoons pistachios in food processor just until finely chopped. Add 1/2 cup graham cracker crumbs and 3 tablespoons melted butter; pulse until well blended. Spoon mixture evenly into 12 lightly greased muffin pan cups; press firmly onto bottoms. Bake at 325° for 5 minutes. Let cool on wire rack.
 
Crust mixture ready to be baked.
 
While your crust is baking, Beat softened cream cheese and goat cheese at medium speed with a heavy-duty stand mixer until smooth; gradually add honey, beating until blended. Add eggs, 1 at a time, beating well after each addition.
 
Cream Cheese, Goat Cheese, Honey & Eggs.
 
Once the cheese mixture is mixed well, stir in lime rind and juice; pour batter evenly into prepared muffin pan.
 
Cheese mixture with lime zest and juice.
 
Place muffin pan in a shallow broiler pan. Add hot water to broiler pan to a depth of 1/2 inch (halfway to top of muffin cups).
Bake at 300° for 20 to 25 minutes or until slightly firm in the center. Carefully remove from oven, and let stand in water bath for 10 minutes.
Remove muffin pan from water bath to wire rack, and let cool completely. Cover and chill 8 hours. Let stand at room temperature 1 hour before serving. Run a knife around edges to remove cheesecakes from pan. 
 
Mini Lime Cheese cakes ready to put on a dish.
 
These Mini Lime Cheesecakes were absolutely delicious.  I WILL be making these again.
 
Below is a list of the ingredients you will need if you want to try to make them too.
 
Ingredients
 
2 tablespoons pistachios
1/2 cup graham cracker crumbs
3 tablespoons butter, melted
1 (8-ounce) package cream cheese, softened 
1 (3-ounce) package cream cheese, softened
1 (4-ounce) package goat cheese, softened
1/3 cup honey
2 large eggs
1/2 teaspoon grated lime rind
1 tablespoon lime juice